The team at MHPOffice realizes that reporting is a helpful tool to keep your clinic running efficiently. Several months ago, we introduced a report that helps you easily access all outstanding balances.
After a little bit of creative thinking, we came up with an advanced system hack for you to run your reports through a specific date range. You can use this for the Recent Payments report and the Recent Credit Card Trxn’s report. But it takes a bit of maneuvering, so follow these steps!
- Log into MHPOffice and go to Reports
- Pick which which report you wish you add a custom date range to – either Recent Payments or Recent Credit Card Txns. (The Outstanding Balances report does not have a date column, so you are unable to sort it by date).
- Once you are on the report page you want to customize, click on the URL and add the following: ?&date_range=custom&sort_by=payment_id&from=
- Before hitting Enter, add the start & end dates you want to sort your report with in this format: YYYY-MM-DD&to=YYYY-MM-DD and hit Enter.
So, if I wanted to search for recent payments for the entire month of June, 2016, this is what my URL should look like: https://reports.mhpoffice.com/reporter/billing/recent_payments?&date_range=custom&sort_by=payment_id&from=2016-06-01&to=2016-06-30
 If you want to sort your June payments by Amount, within the URL, change “payment_id” to “amount” and hit Enter.

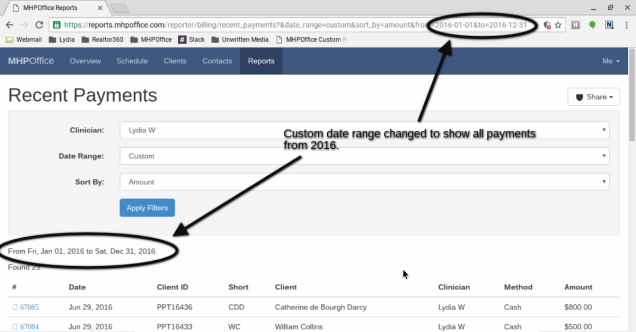
As another example, I sorted my payments by this year. So, my URL reads https://reports.mhpoffice.com/reporter/billing/recent_payments?&date_range=custom&sort_by=payment_id&from=2016-01-01&to=2016-12-31
 You can also follow all of these steps for the Recent Credit Card Txns report with the same results.
If you have trouble, please feel free to contact us at info@mhptoolbox.com and we’d be happy to walk you through it!
